

Last Updated:
22-11-2022
Last Updated:
22-11-2022
Test API Operations in Postman
View the steps required to test the API operations in Postman using the Postman Collections
1. Download the Postman Collection
Click the Download Postman button at the top of the Documentation page of the relevant product to download the Postman Collection.
A zipped JSON file will be downloaded on to your computer that contains the Postman Collection. Unzip the file and save the contents in a convenient location.
2. Open the file in Postman
Open Postman on your computer and import the JSON file by following these steps:
- In Postman, click File > Import
- Remaining in the File tab, click Upload Files
- Navigate to where you saved the Postman Collection. Select the file and click Open
- You will now see a new Collection has been created in your left menu. Click the dropdown arrow to view all the available operations. The Headers, Body and URL will be prepopulated with the required information.
3. Generate an Access Token
OAuth 2.0 is an open standard for authorisation and it is used to provide your applications with secure delegated access. OAuth 2.0 works over HTTP and authorises devices, APIs, servers and applications with access tokens rather than credentials.
Before testing the API you will need to set the authorisation by following these steps:
- In Postman, select the OAuth method in the left panel
- All necessary fields should be populated for you
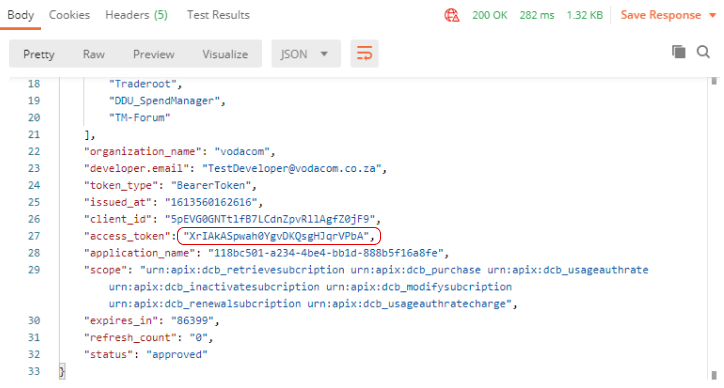
- Click Send and you should receive a 200 success response
- You will see your access token in the access_token key of the JSON object received in the response, as seen in the image below
- Copy the access token to authorise your requests
Please note, the access tokens in the sandbox environments are valid for 24 hours, after which you will have to generate a new access token below to continue testing.
4. Enable Authorisation in Postman
You can now use the access token to authorise your requests by following these steps:
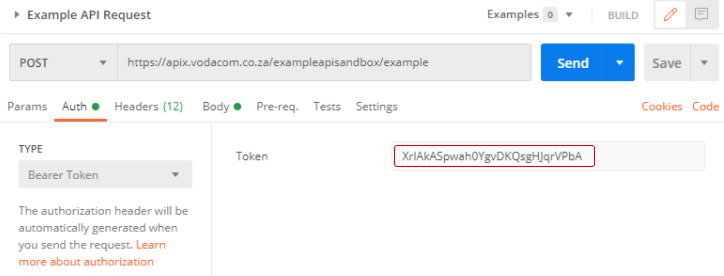
- In Postman, select the API method you want to test in the left panel
- Click the Authorization tab
- Paste the copied access token you generated in step 3 in the Token field
- Your request will now be authorised
5. Start Testing the APIs
You are now ready to begin testing the API methods.
View the response error details below to understand potential reasons why your request may be failing.
| HTTP Code | Description |
|---|---|
| 401 | Invalid or Expired Excess Token |
| 404 | Unauthorized, Failed to Resolve the Request |
| 429 | Rate Limit has been exhausted |
| 500 | Failed to establish the backend connectivity |